Fast loading of blog is the one of most important aspect to stick audience with, There are so many ways to make a blog load faster and one of them is hosting your CSS ( Blogs Skin ) file externally. It really helps to load blog faster.
If you ask the webmasters that how they host their CSS then they will surely tell you that they create another CSS file, upload it on server and connect it externally. But in blogger, if you look into the template then you will find that CSS is used internally. Actually, Blogger has a unique tag <b:skin><![CDATA[ in which you've to store the stylesheet of your blog. Using the CSS externally with Google drive or with any other cloud storage platform has several benefits which I've described below.
Benefits Of Hosting External CSS
Dummies Can't Copy Code : If any new comer in the web designing tries to copy your code then he can't do that. Because he will not easily find the code but experts can easily do it.
Enough Space : Google drive is giving 5GB storage to you so that you can host huge data easily. I think 5GB is enough space. If you complete all the memory then you can upgrade your account from basic to premium.
High Security : Google drive has the high security so it is impossible to get your files or account stolen. At least, it is Google's product and I think you know that how Google has strict rules to security.
Bandwidth : Another thing which you may not get in any other service that Google drive gives to the unlimited bandwidth so that your files may not down while you're sleeping.
Make Private and Public Files : So, Google drive also gives this option to make your files private or public. You can also upload your personal data and make it private so that if your hard disk got damaged then your files will be safe on Google drive.
All This For Free : You may be thinking that these fantastic features are not free but that's not right. All the amazing features which I've provided above are hundred percent free. Even I've left some features.
Hosting Blogger CSS Externally On Google Drive
After reading the benefits, you may be interested in hosting your blog's CSS on Google Drive. So here is the full tutorial with screenshots which you will need to follow. This tutorials contains three parts and below all parts are given. Just go and do it now.
Caution:
Before beginning the whole process, you must take a backup of your template and blog. Because, unfortunately if any mistake happen then the backup will save your efforts. It is always recommended to take bakup while doing any kind of editing with your template.
1. Making CSS File
So this is the first step to create the stylesheet file. Simply Go to Blogger >> Template >> Edit HTML. There you will see the <b:skin> tag which will be collapsed. Just click on the arrow in the left side to <b:skin> to expand that.Making CSS File
So this is the first step to create the stylesheet file. Simply Go to Blogger >> Template >> Edit HTML. There you will see the <b:skin> tag which will be collapsed. Just click on the arrow in the left side to <b:skin> to expand that.
If you ask the webmasters that how they host their CSS then they will surely tell you that they create another CSS file, upload it on server and connect it externally. But in blogger, if you look into the template then you will find that CSS is used internally. Actually, Blogger has a unique tag <b:skin><![CDATA[ in which you've to store the stylesheet of your blog. Using the CSS externally with Google drive or with any other cloud storage platform has several benefits which I've described below.
Benefits Of Hosting External CSS
Speedup Loading Time : When you combine the all stylesheet of a website in a one file then it helps in improving the loading speed. It is also important to host that file on any good server that may not down and Google drive is best for it.
Dummies Can't Copy Code : If any new comer in the web designing tries to copy your code then he can't do that. Because he will not easily find the code but experts can easily do it.
Enough Space : Google drive is giving 5GB storage to you so that you can host huge data easily. I think 5GB is enough space. If you complete all the memory then you can upgrade your account from basic to premium.
High Security : Google drive has the high security so it is impossible to get your files or account stolen. At least, it is Google's product and I think you know that how Google has strict rules to security.
Bandwidth : Another thing which you may not get in any other service that Google drive gives to the unlimited bandwidth so that your files may not down while you're sleeping.
Make Private and Public Files : So, Google drive also gives this option to make your files private or public. You can also upload your personal data and make it private so that if your hard disk got damaged then your files will be safe on Google drive.
All This For Free : You may be thinking that these fantastic features are not free but that's not right. All the amazing features which I've provided above are hundred percent free. Even I've left some features.
Hosting Blogger CSS Externally On Google Drive
After reading the benefits, you may be interested in hosting your blog's CSS on Google Drive. So here is the full tutorial with screenshots which you will need to follow. This tutorials contains three parts and below all parts are given. Just go and do it now.
Caution:
Before beginning the whole process, you must take a backup of your template and blog. Because, unfortunately if any mistake happen then the backup will save your efforts. It is always recommended to take bakup while doing any kind of editing with your template.
1. Making CSS File
So this is the first step to create the stylesheet file. Simply Go to Blogger >> Template >> Edit HTML. There you will see the <b:skin> tag which will be collapsed. Just click on the arrow in the left side to <b:skin> to expand that.Making CSS File
So this is the first step to create the stylesheet file. Simply Go to Blogger >> Template >> Edit HTML. There you will see the <b:skin> tag which will be collapsed. Just click on the arrow in the left side to <b:skin> to expand that.
When you will click that arrow then the code will appear with the blue color which is the StyleSheet of your blog. Now you've to copy the whole code between <b:skin><![CDATA[ Code Will Be Here ]]></b:skin> tags.
Just Select and cut everything between <b:skin><![CDATA[ and ]]></b:skin>
When you've copied the whole code of your blog, simply open the notepad, paste the coding in notepad, press CTRL+S to save. Now a popup will appear where you will be asked for the name and location of that file. Come to bottom, in the "Save as Type" you've to choose "All Files" and in the "File Name" write "Style.css".
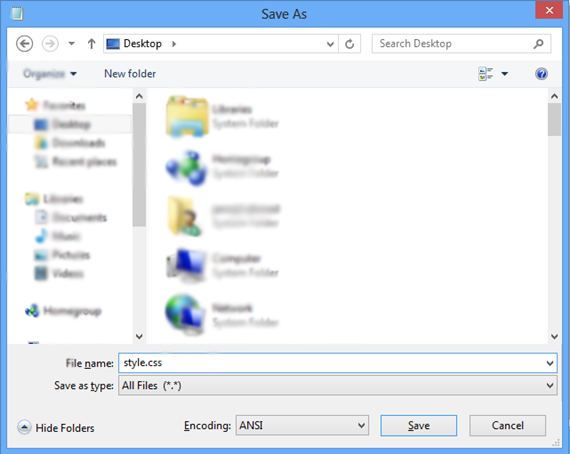
After setting up the file simply save it and you've done the first step. Now it's time to jump into second step.
2. Uploading File To Google Drive
So you've made your file and you're going to upload it on Google Drive. Simply Go To Google Drive. Sign in with your Google account. Now you're in your drive, I recommend you to create the folder with your blog name in which you should upload the files for your blog. Well, it's yours choice. In order to upload that file, simply click "Upload" button with arrow icon and choose "Files".
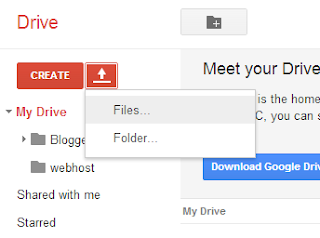
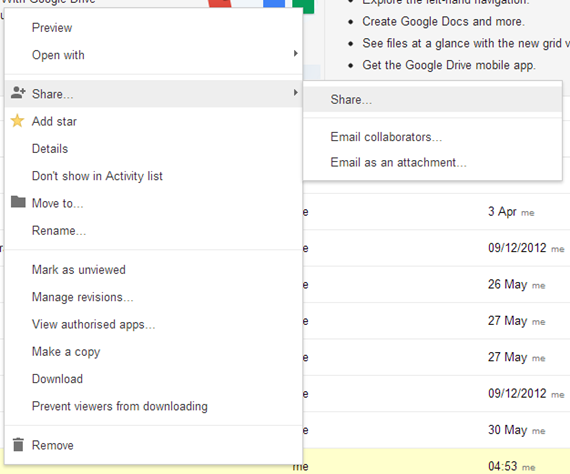
Now choose the file which you have created in the first step and make sure it is having .css extension. After that it will be uploaded. Here you've to right click on that file, Go to Share and again click on Share.
Now share setting will appear. You will see the link of that file there. Copy the link and save it in notepad. In the below settings, you will see Who Has Access?. There it will be private and you've to make it public. Click the change.
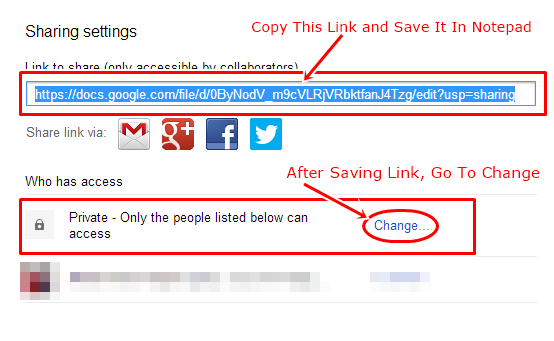
There in the change page, just tick mark "Public On The Web" and hit the "Save" button.
So here you completed the second step. Now get started with the third and last step.
3. Connecting External CSS File In Blogger
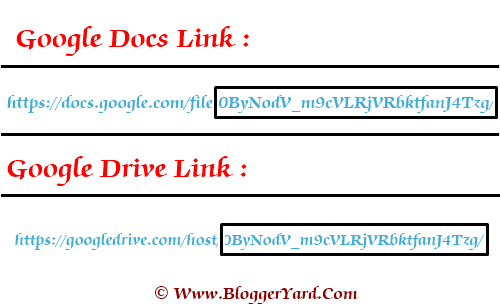
<link href='https://googledrive.com/host/YOUR-FILE-CODE' type='text/css' rel='stylesheet' />
In the above code you've to replace the file code. To get the file code, open the notepad in which you've saved the link and in that link you will see the code. Look at the below image to understand it.
0 Comments