There's no shortage of form builders and survey tools that you can use to add a new contact form to your website, build an event registration form, or design a customer satisfaction survey.
But what if you're trying to replace paper forms in a doctor's office, collect data at a trade show, or track your expenses for a repair job? You'll want a tool designed specifically for data collection, so your team members can submit pictures, GPS location, and signatures on the go, even when they're offline. Then, you need a way to act on that information, whether that's exporting the data into reports or syncing with your CRM software.
We researched the most powerful data collection tools to help you modernize your team's workflow, get more done, and save data entry headaches.
What Makes a Great Data Collection Tool?
Data collection forms let you capture almost any type of information, without having to worry about a wifi signal.
The five apps in this chapter, however, offer more than that. They address some of the most complex issues with data collection, like helping you analyze thousands of GPS coordinates or ensuring your forms are accessible to everyone. You'll also be able to use Zapier with all these apps to integrate the tools you already use into your workflow.
We tested more than 15 of the most popular data collection apps and looked for ones that:
- Offer a unique feature above and beyond basic data collection
- Have a low barrier to entry
- Help you scale or automate a workflow
This roundup focuses purely on data collection software. While you can use traditional surveys or polls to gather information, they are not catered to collecting and reporting on diverse, complex data types.
The Five Best Data Collection Tools
- Device Magic for pre-filling form data
- Fulcrum for geolocation with custom maps
- Magpi for interactive voice data collection
- FastField for exporting data into Word and PDF templates
- Zoho Forms for accepting payments
Device Magic (Web, iOS, Android)
Best data collection app for pre-filling form data
Typing on your phone can be slow, prone to mistakes, and nearly impossible if you're also trying to juggle other tasks. Device Magic's forms make sure your team doesn't have to type any more than absolutely necessary by allowing you to pre-fill form fields with the Dispatch feature.
Let's say you created a repair form for your crew to report their work. You could pre-fill the form fields with the information you already know (repair description, parts needed, and price estimate), and your crew would only need to fill in the final details about the work they did.
Before you can send a Dispatch to your team, you first need to create the form. From the Device Magic dashboard on the web app, navigate to the Forms tab, and click the green New form button. You'll see 16 form field options on the left side to collect things like barcodes, images, the date, or location. Simply drag and drop the ones you want to use into the white editor in the middle of the page. For each field, you can customize the label (or question title) and preview the form as you go. Once you're happy with the form, save it, and return to the Device Magic dashboard.
Next, go to the Dispatches tab, and click the green New Dispatch button. You'll see a three-step set-up process where you can select the form you want to deploy with pre-filled answers and which device(s) to send it to. Then, you can customize the form name and description.
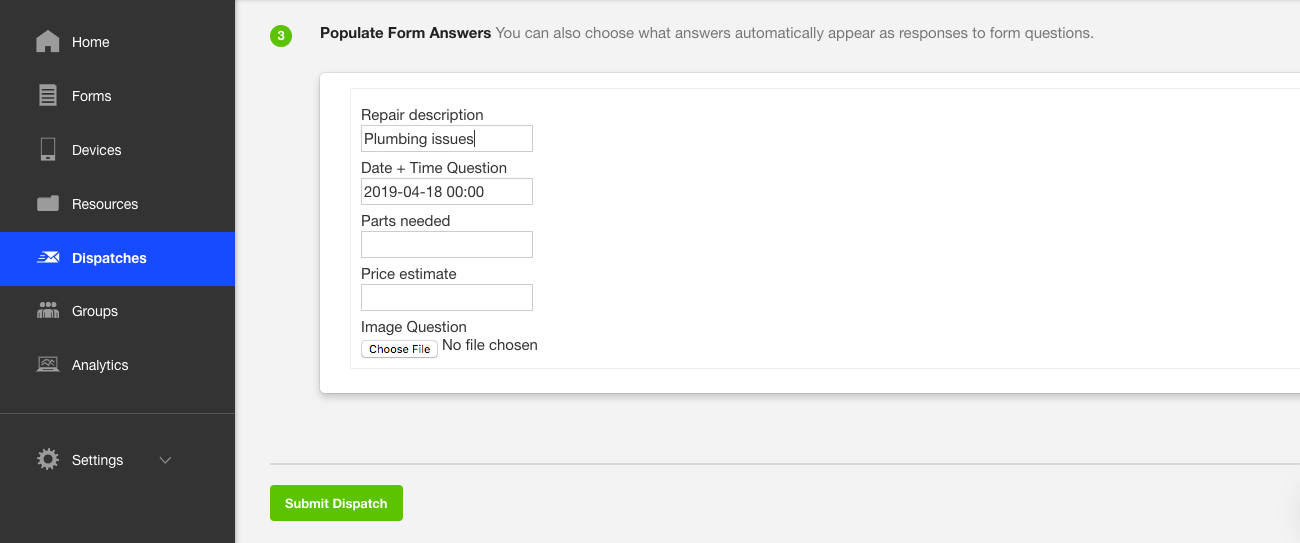
The real magic happens at step three, when you can populate form answers. You'll see all the fields from the form you selected in step one, for which you can type in the answers that will automatically appear as responses. You can pre-populate as many or as few fields as you want. For example, you could pre-populate the "email address" field with each person's contact information or the "image" field with graphics you have on file that are associated with the form.
Finally, click Submit Dispatch, and the form will be sent via the mobile app to the devices you identified in step one.
When someone receives the form, it's just as easy for them to add information. They can attach images directly from their phone's photo library, add their signature, or sketch diagrams, then send them along with the rest of the form data. They won't even need to input their location, since Device Magic automatically logs where the form was filled out.
Note that the whole Dispatch process must be done on the web app in the Administration Console. The mobile apps are used to collect data and view the status of submitted forms, but not to create new forms or send Dispatches.
Device Magic Pricing: From $25/month per device for the Standard plan with unlimited forms and submissions. The Dispatch feature is only available with the Enterprise plan (get a custom quote).
Automate Device Magic with Zapier's Device Magic integrations.
Fulcrum (Web, iOS, Android)
Best data collection app for geolocation with custom maps
Fulcrum's advanced geolocation features allow you to add context and detail about a user's work and field data submitted through forms. You can use basemaps from online or offline sources, like Google Street View, satellite imagery, and OpenStreetMap, and custom map servers or your own offline map packages. You can also plot your form entries on maps that contain the data you need—something especially important for canvassing, property surveys, or census polls.
For example, organizations in construction, environmental, and transportation industries need to gather many types of information from a form, with GPS location being one of the most important data points. Normally, they would simply receive a text-based list of GPS locations, which is difficult to analyze and understand. With Fulcrum, they can overlay those GPS locations onto a variety of different maps to better understand and visualize patterns from their data.
After you sign up for Fulcrum, you'll choose whether to build your form from scratch with a drag-and-drop editor or select an app template from the library. You can collect almost any type of data, including audio clips, signatures, videos, or barcodes.
Once you've created the form on the web, you'll need to download the form to your mobile device to collect responses. Log in to the iOS or Android app, and click the syncing arrows icon in the upper-right corner to download your forms.
As you start receiving form submissions, you can begin to overlay the submission locations onto different basemaps and map packages.
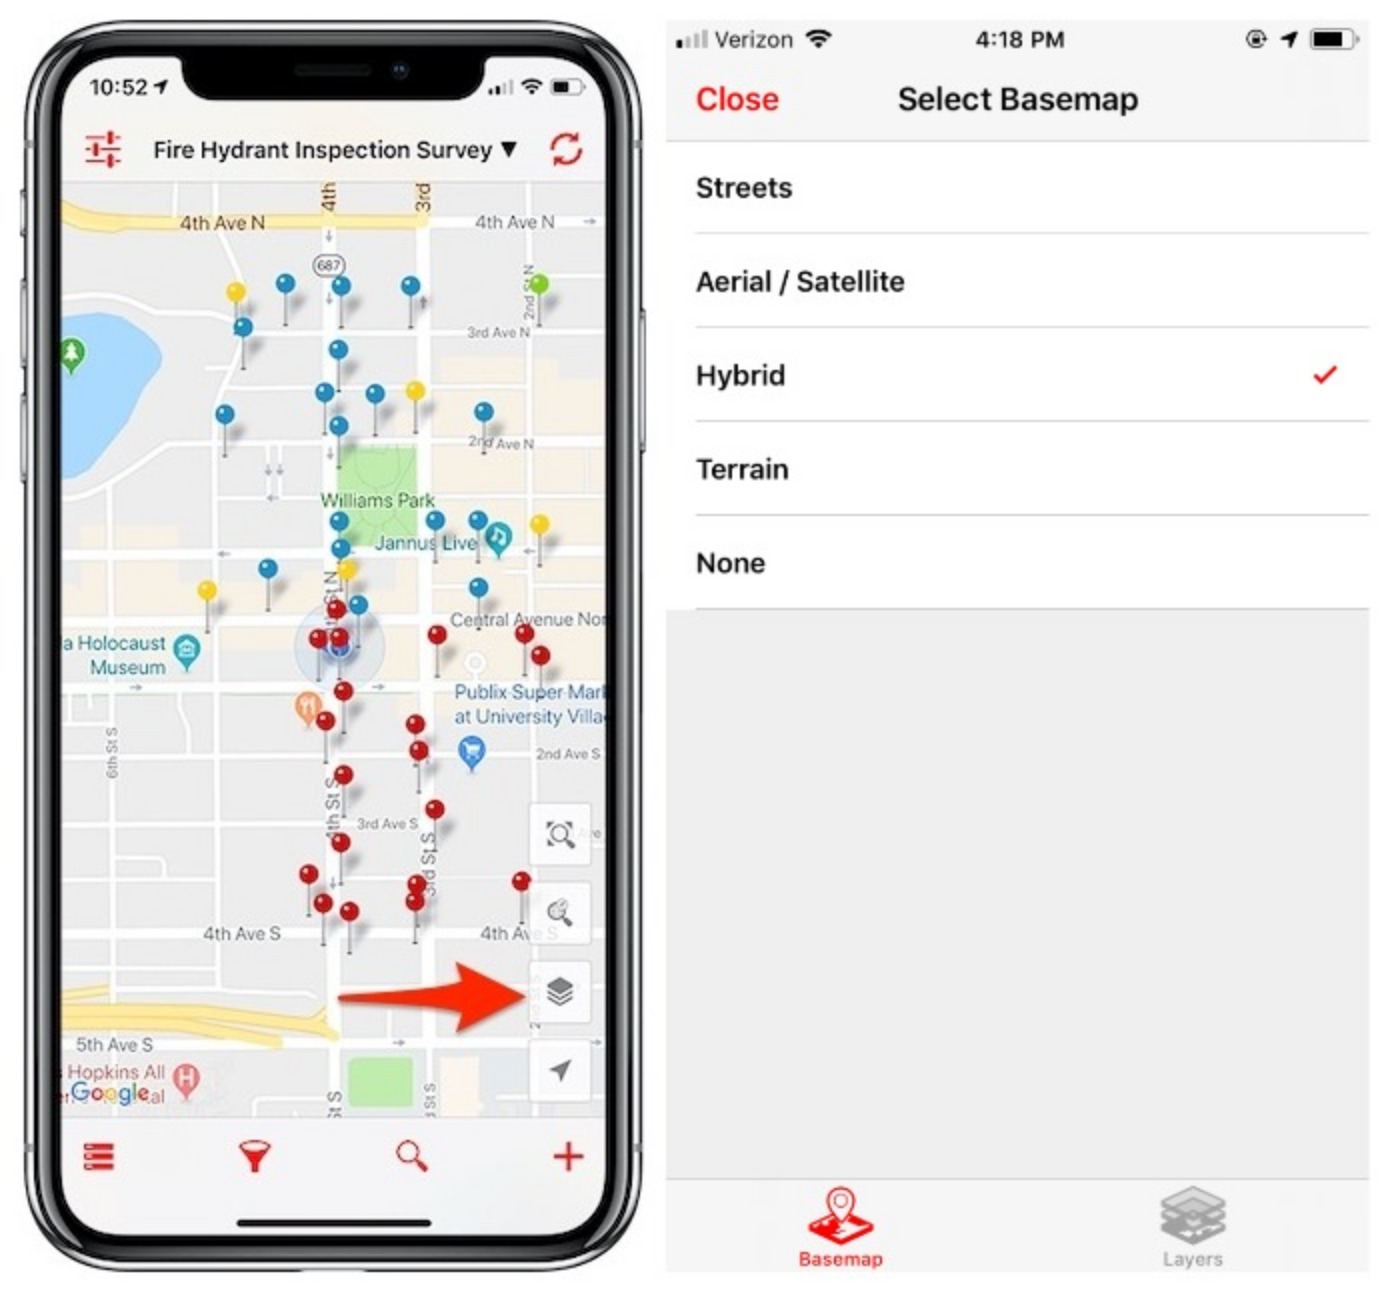
In the iOS version of the Fulcrum app, click the map icon in the lower-left corner. By default, you'll see dropped pins on the street view of Google Maps. If you click the third icon (the layers icon), you can change the basemap view to aerial/satellite, hybrid, or terrain. You could, for example, plot form data about new homes being built onto a Google Street View map to see how your building plan will impact the entire neighborhood.
You'll also see an icon for layers at the bottom of the screen. Clicking the Layers tab will allow you to access custom layers that you have either uploaded directly to your device or added to Fulcrum through the web app. The mobile apps can support two custom map layer options: MBTiles for offline and online use, and Tile XYZ sources for online layers.
If you need to share your form data, Fulcrum allows you to export it in nine different formats including Excel, CSV, Google Earth, and Shapefile. You can also create PDF reports from your iOS or Android app and share them via email, SMS, Dropbox, or any other supported app on your device. If that's not enough, you can even create embeddable maps to add to your website, blog, or internal dashboard for real-time visualizations of data from the field.
Fulcrum Pricing: From $22/user/month for the Essentials plan that includes 20 GB storage.
Automate Fulcrum with Zapier's Fulcrum integrations.
Magpi (Web, iOS, Android)
Best data collection app for interactive voice data collection
Digital forms do the job in almost all scenarios. But what if you need to collect data from a less-literate population? Or from people with visual impairments? Magpi offers a unique voice-first experience that's just as easy to set up as a digital form. The feature is called IVR, or interactive voice response, and it allows you to deploy your forms as interactive voice phone calls, with respondents answering by pressing the phone's numeric keypad.
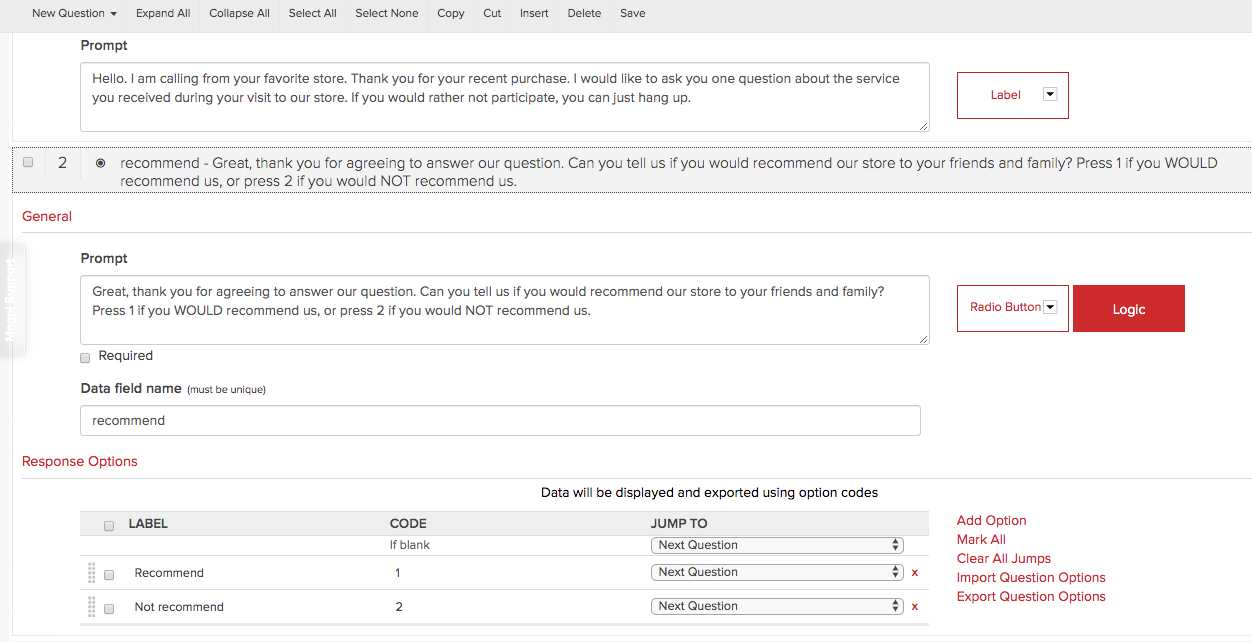
Magpi IVR forms use the same form designer as a digital form, with one key difference: You need to remember that you're essentially writing a script for the artificial intelligence to read aloud. For example, in the form designer, you can either enter a prompt for each question type or add a label, an information-only field that doesn't require a response.
For a standard digital form, a prompt or label can be as simple as stating the question. For IVR, however, they need to mimic a conversation, so your first label would need to account for an introduction and explanation of the survey. And your last label would need to thank the participant and end the conversation.
You'll also need to pay attention to the question types you use. For example, GPS and photo questions wouldn't apply to voice responses. On the other hand, labels, radio buttons, and numeric question types work well with voice. Skip logic applies to all question types.
When you're ready to deploy your IVR form, navigate to the Share tab in the form builder, and then click the Interactive Voice Responses sub-tab. Enter the recipient phone numbers, select the language from a list of 26 options, specify the timing, and click the Initiate IVR Sharing button. The calls will be automatically made within 60 seconds of the specified time.
Once the respondent is finished answering, the form data will appear in the Magpi Data tab, just like with any other Magpi form.
Magpi Pricing: Free for up to 20 forms per account; from $500/month for unlimited forms that also includes 50 messages credits, which are required to use IVR.
Automate Magpi with Zapier's Magpi integrations.
FastField (Web, iOS, Android)
Best data collection app for exporting data into Word and PDF templates
Once you've collected the data you need, you then need to figure out how to present it to stakeholders or clients. For some scenarios, like home repairs or site inspections, you would need to aggregate field workers' notes and assessments into a professional PDF to share with the homeowner or facility manager. This is traditionally a manual exercise, requiring you to export the data and copy and paste it into your branded template. FastField, however, eliminates this repetitive task by allowing you to export data directly into a Word or PDF template you designed.
It's easier to export form data into a Word doc because FastField gives you a "starting template" to customize, complete with all the "fieldkeys" for each form variable that will map the correct data from FastField to the Word doc. For example, our original form had a Submitted By field, and FastField converted that field into this fieldkey: $userName$.
Once you have a form created in FastField, click the Reporting button from the editor, and then click on the Custom tab. Click Generate and Download to download a Word doc starting template.
The initial Word report will simply have a table with your form's field titles on the left and the fieldkeys on the right, which will eventually populate the responses collected in FastField. You can then add your company branding, add photos, or edit the layout, font, colors, etc. When you have customized the template to your liking, navigate back to the Reporting settings, and under the Custom tab, upload the template to the Upload Word Predefined Report section. You would need to repeat this process for each form you create, as the Word template is unique to the fields in the specific form.
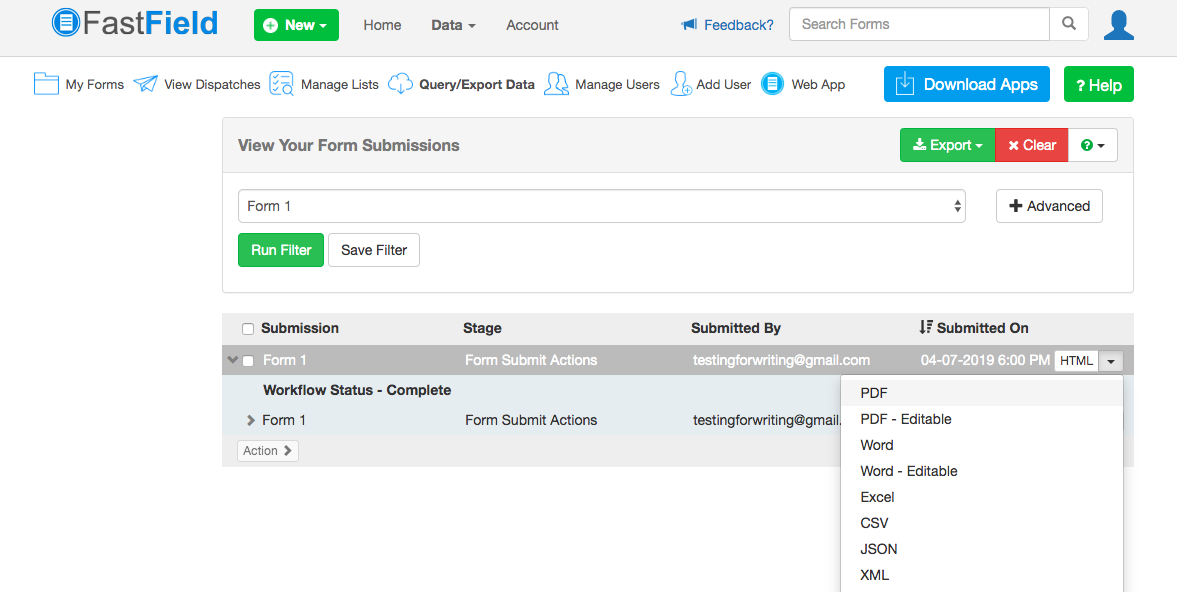
Once you've set up this process for the form, you can then directly export any form submission into the Word template you created. Go to the Data tab on the top, and click Get Data. Select your form from the dropdown list, and click Run Filter. You'll see each individual submission for that form. On the far right side of each submission, click the arrow and select Word or Word - Editable as your exported outputs. FastFields will map the form data that is housed inside the app to the fieldkeys in the Word template.
You can also replicate this set up with PDF templates, although FastField doesn't provide a starting template for you to work from. Instead, you would need to set up your own PDF using Adobe Acrobat, adding the correct form fields within Adobe (text field, checkbox, radio button, etc.) on top of your blank PDF document. Because these fields will be populated by data collected by your FastField form, you need to name each PDF form field to match the field's fieldkey within FastField. For more information on this process, read FastField's documentation.
FastField Pricing: $20/user/month for unlimited forms.
Automate FastField with Zapier's FastField integrations.
Zoho Forms (Web, iOS, Android)
Best data collection app for accepting payments in mobile forms
If you're making forms to help complete on-site jobs, solicit donations, or register users for a paid service, you would need to bill customers in a separate app. Zoho Forms lets you accept payments directly from your form, saving you and your customers the hassle of bouncing between apps.
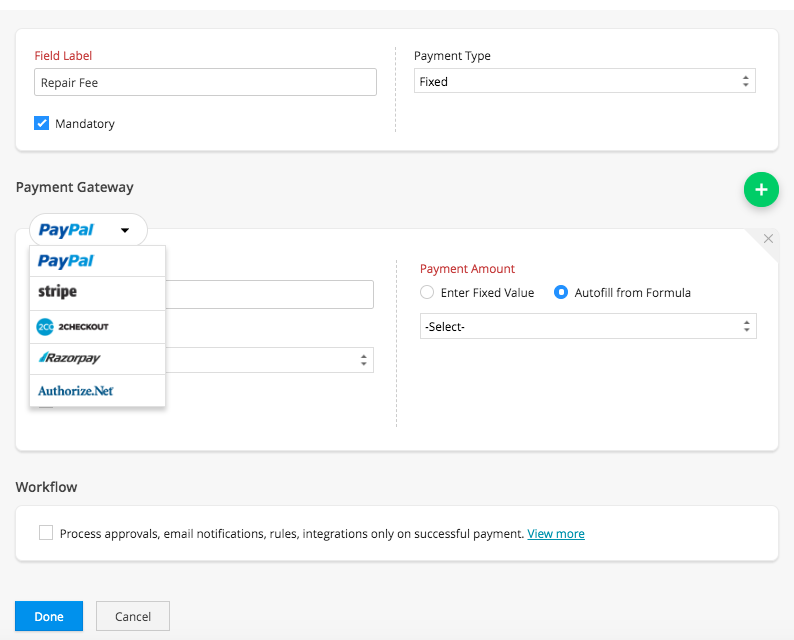
Once you log in to Zoho Forms, you'll see a basic editor with a green button to create a new form. You can build one from scratch or choose from more than 30 form templates. Regardless of which option you choose, you'll land on the form editor. Click the Payment field, and drag and drop it onto your form.
You can then edit the payment settings by adding a label (a title for your payments field) and choosing whether the payment type will be fixed or variable. Next, select which third-party payment merchant(s) you want to use to receive payments; Zoho Forms integrates with PayPal, Stripe, 2Checkout, Razorpay, and Authorize.net. Each one will have its own setup process, which you will have to complete within Zoho Forms. You can select one payment merchant or click the green + icon to add up to all five.
With any third-party merchant you select, you can also choose whether to activate a payment workflow, where certain actions will get triggered after a successful payment, like approval processes and email notifications. (Note: you must upgrade your free plan to use the approvals feature.)
You can also create workflows for your overall form, setting up rules in a simple workflow editor in the Rules tab within the form editing interface. The workflow editor lets you specify which conditions need to be met in order to perform a certain action. For example, if a question in your form is answered in a certain way, then you could redirect the user to a thank-you page (that you can customize), assign a task to your teammates, or send a notification email to someone.
If you're assigned tasks based on a form submission, you can view all your to-dos in one place by clicking the Tasks tab.
Zoho Forms Pricing: Free for three forms and 500 submissions/month, as well as 10 payment transactions for all time; from $8/month for the Basic plan that includes 10,000 submissions/month and no limit to the number of payment transactions.


0 Comments